Tutorial: going through examples
We do strongly recommend to go through all examples, as they show all the features of Windy Plugin System.
In our Windy Plugin Template repository, you can build each example by running npm run example01, npm run example02, etc.
Examples are served at https://localhost:9999/example01/plugin.js so you can you can tweak them and test them yourself at Windy.com.
Table of contents
01: Predefined CSS classes
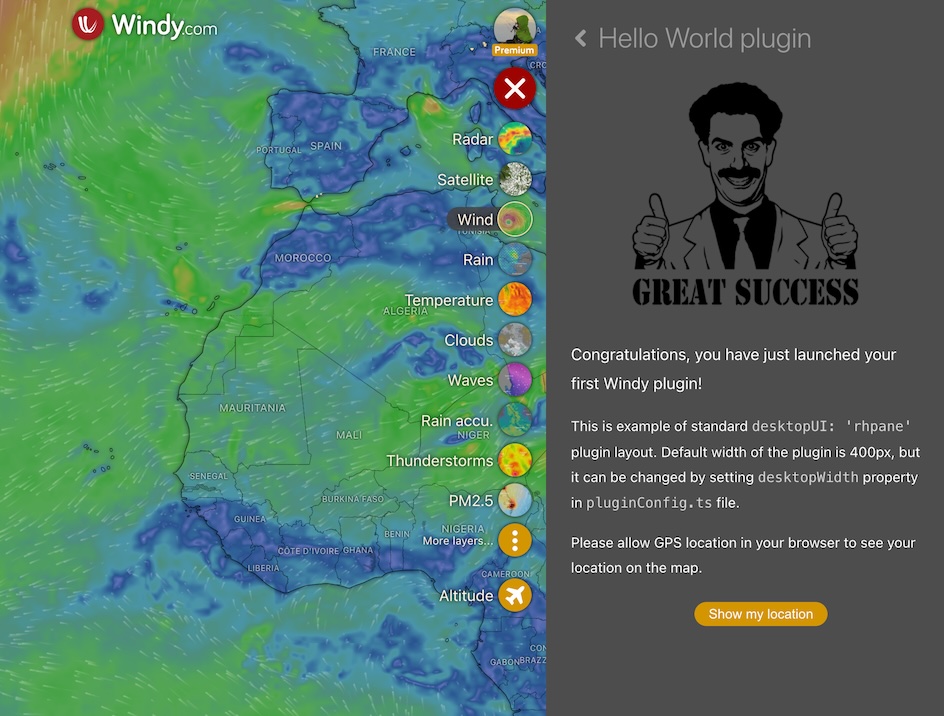
Example01: Hello World is the simplest possible Windy Plugin, that does nothing, but displays a message "Hello World".
As configured it opens from right hand pane on desktop and as a full screen on mobile devices.
HTML code of the plugin looks like this:
<div class="plugin__mobile-header">
    { title }
</div>
<section class="plugin__content">
    <div
        class="plugin__title plugin__title--chevron-back"
        on:click={ () => bcast.emit('rqstOpen', 'menu') }
    >
    { title }
    </div>

    Here is rest of HTML code

</section>plugin__mobile-header, plugin__content and plugin__title are predefined Windy.com classes, that will ensure consistent look and feel of your plugin.
For fullscreen and rhpane plugins we do recommend to stick with them.
Since your plugin is launched from Windy.com's main menu, plugin__title is clickable and contains chevron back. Clicking on title will close your plugin and return user back to main menu.
Let's look ad the plugin's code:
import bcast from '@windy/broadcast';
import { map, centerMap } from '@windy/map';
import { getGPSlocation } from '@windy/geolocation';

import { onDestroy } from 'svelte';

import config from './pluginConfig';

const { title } = config;

let marker: L.Marker | null = null;

// rest og the code goes here ...
As you can see Windy.com API modules are imported with @windy/ prefix.
Svelte's onDestroy method is imported from installed node_modules.
Leaflet GL's L object is available globally and already defined in our Typescript types, so you do not need to import it.
Local files are imported as you are used with path relative to the file.
Important: Any Typescript types imported into Svelte component MUST be imported as import type and not just import, otherwise you will get an build error.
02: Plain JavaScript, no Svelte
If you opt not to use any Svelte features or you just want to use plain JavaScript (instead of Typescript) check out example 02
What is most important to delete lang="ts" from the script tag of your plugin.
Remember, that you can manipulate your HTML code just after it is mounted to the DOM, so wait till onMount method is called.
In this example, we do not use predefined Windy.com plugin classes (not recommended) so you are responsible to style body of your plugin yourself.
.this-is-body-of-my-plugin {
    background: #565656;
    color: white;
    line-height: 1.8;
    position: absolute;
    width: 100%;
    height: 100%;
    top: 0;
    left: 0;
    padding: 2em;
}
03: Events and interpolation
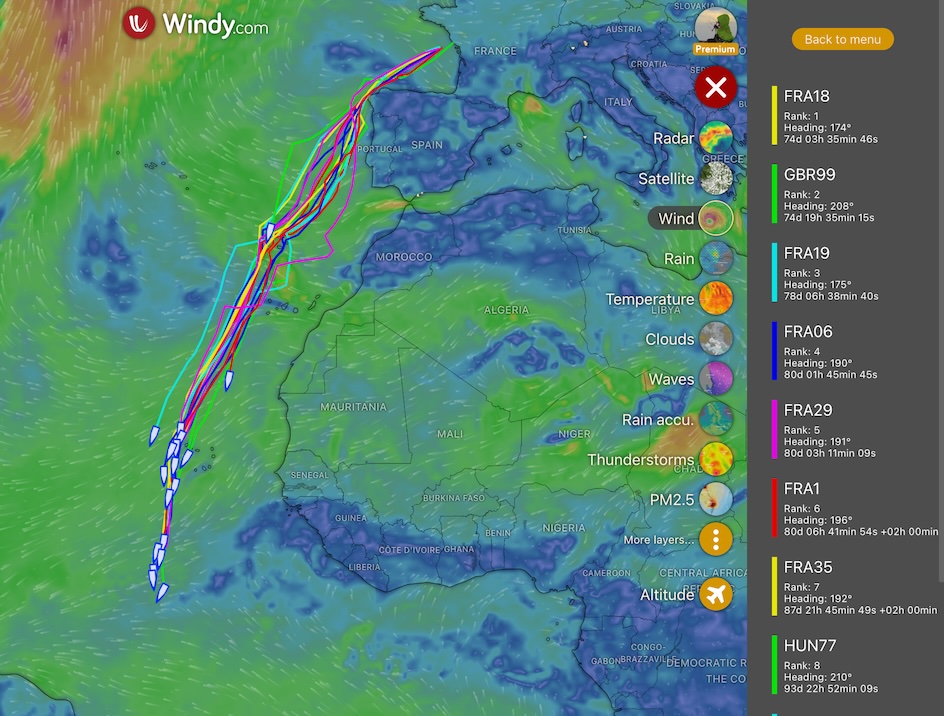
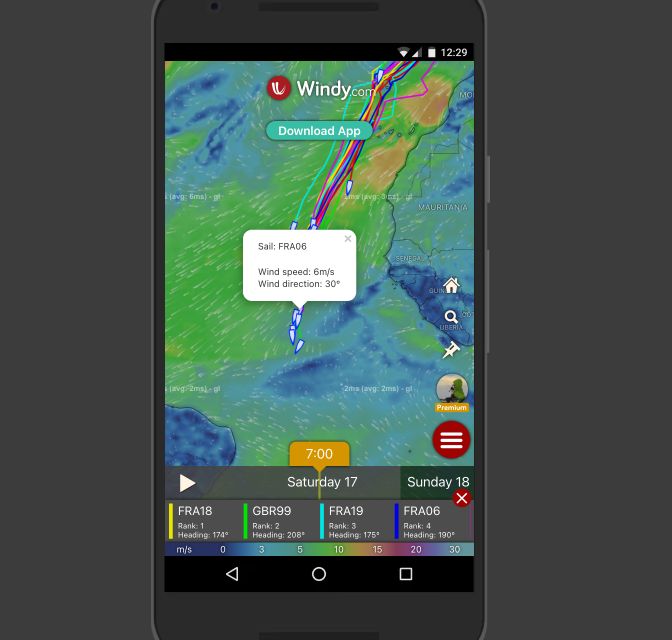
Example03: Boat Tracker is the most important example so far.
It demonstrates:
- Use of events and listeners
- How to adjust plugin's layout for mobile and desktop
- How to interpolate raw weather data from a map
- How to convert units of weather data
 |  |
const config: ExternalPluginConfig = {
    // ...rest of configuration
    desktopUI: 'rhpane',
    mobileUI: 'small',

    // We make the plugin a little bit narrower
    desktopWidth: 200,

    routerPath: '/boat-tracker',
};
As you can see in our configuration, we make use of desktopWidth property, to make right hand pane of our plugin just 200px wide. On mobile devices, it will be displayed as a small item at the bottom of the screen, to let the user see the map.
routerPath is set to /boat-tracker, so users, who have installed this plugin, your plugin will be accessible from URL https://www.windy.com/plugin/boat-tracker.
As you can see in the code onMount method is used to add listeners to the map, and onDestroy method is used to remove them, and also remove all displayed features from the map.
// ...rest of code is here

export const onopen = () => {
    loadResults();
    map.setView([14, -29], 4);
};

onMount(() => {
    map.on('zoom', updateIconStyles);
    map.on('zoomend', updateIconStyles);
    map.on('viewreset', updateIconStyles);
});

onDestroy(() => {
    removeAllMapFeatures();

    map.off('zoom', updateIconStyles);
    map.off('zoomend', updateIconStyles);
    map.off('viewreset', updateIconStyles);
});
Whenever user clicks on the map, singleclick event is emitted and we can react to it.
getLatLonInterpolator().then((interpolateLatLon: CoordsInterpolationFun | null) => {
    if (!interpolateLatLon) {
        // No interpolator available for this overlay
    } else if (store.get('overlay') !== 'wind') {
        // For sake of the simplicity, we interpolate only wind values. Please select wind overlay
    } else {
        // Interpolated values can be either invalid (NaN, null, -1)
        // or array of numbers
        const interpolated = interpolateLatLon({ lat, lon });

        if (Array.isArray(interpolated)) {
            // I everything works well, we should get raw meterological values
            // for the position of the boat, as the are in the wind overlay RGBA tile

            const { dir, wind } = wind2obj(interpolated);

            // This will convert wind speed form m/s to user's preferred units
            const windSpeed = metrics.wind.convertValue(wind);

            html += `Wind speed: ${windSpeed}<br />`;
            html += `Wind direction: ${dir}°<br />`;
        } else {
            // No interpolated values available for this position';
        }
    }
});
04: Singleclick and parameters
Example04: Aircraft Range demonstrates how to create a plugin, that will display range of aircraft.
It uses singleclick event to change position, modifies URL to reflect current position and can be opened from context menu.
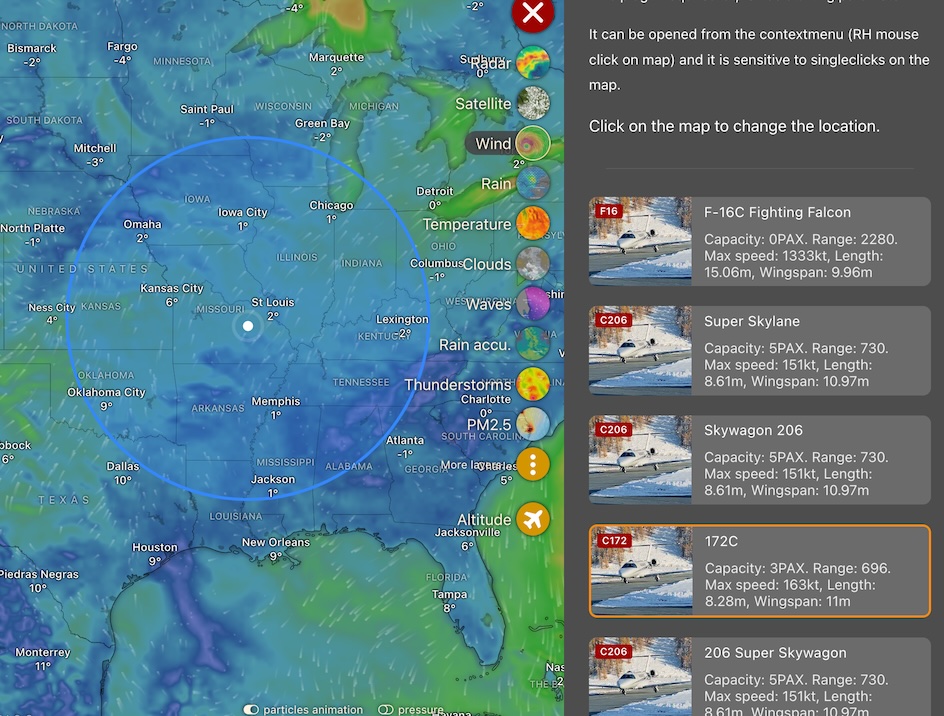
Lets look at the configuration:
const config: ExternalPluginConfig = {
    // ...rest of the config is here

    // Link to this plugin will be additionally added to RH button
    // context menu
    //
    // This will enable to open plugin from context menu, with lat, lon
    // parameters passed to onopen method
    addToContextmenu: true,

    // This plugin can be opened from URL
    // https://www.windy.com/plugin/route-path/:lat/:lon
    routerPath: '/aircraft-range/:lat?/:lon?',

    // Whenever user clicks on map and plugin i opened,
    // singleclick events is emitted with name of this plugin
    listenToSingleclick: true,
};
Singleclick events are emitted with name of the plugin, so only you can listen react to them.
import config from './pluginConfig';

const { name, title } = config;

// ...rest of the code is here

onMount(() => {
    singleclick.on(name, setLocation);
});

onDestroy(() => {
    removeMapItems();
    singleclick.off(name, setLocation);
});
Whenever user changes location, we would love to change URL to reflect current position. setUrl method fixes this for us.
import { setUrl } from '@windy/location';

// ...rest of the code is here

$: setUrl(name, { lat: selectedLat, lon: selectedLon });
INFO
setUrl method requires the same parameters as you receive in onopen method, so if you define routerPath in your pluginConfig.ts as /hello-world/:lat?/:lon?, then your plugin will be opened with parameter { lat: string; lon: string } parsed from URL.
And also setUrl method will change URL only if you provide it with {lat, lon} object.
05: Embedded plugins stay open
Plugins that open in RH pane are exclusive, that means any other RH pane plugin (including our our internal) will mercilessly close them.
Example05: Airspace Map shows the solution to this problem which is to open plugin with desktopUI property se to embedded in the configuration.
const config: ExternalPluginConfig = {
    // ...rest of the config is here

    // WOW! This plugin will stay open, even if user opens
    // another plugin
    desktopUI: 'embedded',
    mobileUI: 'small',
};
Please look at the HTML code of plugin.svelte file and remember that **embedded plugins does not use ``plugin__titleandplugin_contentCSS classes.** Just wrap your HTML code withdiv` and style it yourself.

06: Using d3 and getting forecast data from backend
Example06: Foehn chart shows the plugin that draws a simple chart using d3 library and fetches forecast data from backend.
Importing external modern browser libraries like d3 is easy, just install it with npm install d3 and import it into your plugin with import * as d3 from 'd3'. Rollup bundler should take care of the rest.
This plugin also demonstrates how to fetch forecast data from backend.